Reproducible analysis: testing
Issue
When writing code we have some expectations about what it should do. We’d like it do something and, even better, do exactly what we want. Verifying this is harder than it seems. You can load a function, run it with some data and check manually if you like the results. However, this scales pretty badly as your code base grows. It becomes impossible to manually check all the details and accidents are bound to happen. Another problem is this type of tests is rather ephemeral. They’re saved nowhere (except maybe in your head) so you’ll have to make them again next time you want to test your code.
Those are the main reasons I started writing automated tests. But there are other benefits. If focusing on testing almost magically you write better code because you try to keep your functions as small and modular as possible. Tests also give you a goal to work towards (if writing the tests beforehand, which is a best practice but demands a level of discipline I rarely possess). This makes it especially easier to pick up code you didn’t work on for some time since you get an idea of where exactly you were. Last but not least, tests document your code without having to write explicit documentation.
This is not to say there is no place for just playing around a bit with your code. You’re less restricted by a rigid structure so you might discover things you wouldn’t have discovered otherwise. On a side note: what we’re doing here is unit testing. Each function is tested but for example I don’t test the integration between functions.
Solution and alternatives
To do the testing I chose to use the testthat package since it fits in nicely with the devtools discussed in my previous post. This is actually one of the main reasons I opted to cover the devtools part first. A very rudimentary type of testing is implemented in devtools by default. When running check() in the console some basic sanity checks are executed to make sure your package isn’t completely broken.
Other R packages to test exist. There’s RUnit which is pretty complete and even offers some extra debugging tools. Sadly enough it’s no longer in active development. Next to that there’s unitizer. It has an impressive number of commits (about 2k) for just a single contributor. But a single contributor doesn’t really guarantee future active development of course. The selling point of unitizer is it offers a more streamlined debugging experience with clear visualization of the difference between actual/expected and an interactive test REPL of kinds. Might be interesting to cover this package in a separate post since it seems to have a lot going for it. tinytest is relatively new and seems quite limited in its abilities at the moment. Guess that could be called lightweight as an advantage.
How testthat works
Having decided to focus on testthat, how does it work? First you have to scaffold the tests. This is as easy as running use_testthat() in the console. In the spirit of devtools this does several at the same time:
- creates a tests directory
- adds
testthatto the suggested dependencies in theDESCRIPTIONfile - creates a
testthat.Rfile in the tests directory
Notice testthat is put in the in Suggests and not Imports section of DESCRIPTION. Always make sure it’s properly installed.
Also, don’t get confused by the testthat.R file. Originally I assumed this was a file to put tests in. It’s not. This is a file helping with the automated checking (done by devtools::check()).
Tests should have a certain structure in order to be valid. First of all, the file they’re in must have a filename starting with “test” in order to be picked up by the test runner. If you use the devtools CLI this will be taken care of automatically. Next to that, the file must contain expectations grouped together in a test. A test file can contain multiple tests.
Basic example
Regarding test structure,I make sure the names of the test files matches the names of the code files. So since I have R/tidy.R I also want a tests/testthat/test_tidy.R file. There’s no need to start modifying files directly yourself. Run use_test("tidy") in the console and a test file called tests/testthat/test_tidy.R will be automatically created with a minimal example.
As an example look at the tests for tidy.R:
test_that("tidyNottem() returns data.frame", {
  expect_is(nottem %>% tidyNottem, "data.frame")
})

test_that("tidyNottem() returns tidy data", {
  expect_named(nottem %>% tidyNottem, c("month", "year", "value"))
})
First of all you can see that each test only contains a single expectation. I prefer to have the tests containing as little expectations as possible. In this case there’s just a single expectation per test but might be more depending on the function.
You can also see expectations go beyond checking mere equality. Actually, there’s a whole range of expectations helping in writing clean tests. Also note you can have piping in your argument for actual. This is not always possible when but makes tests very readable. It’s not possible if for example you’re testing if an error occured or if you’re making multiple assertions in the same test.
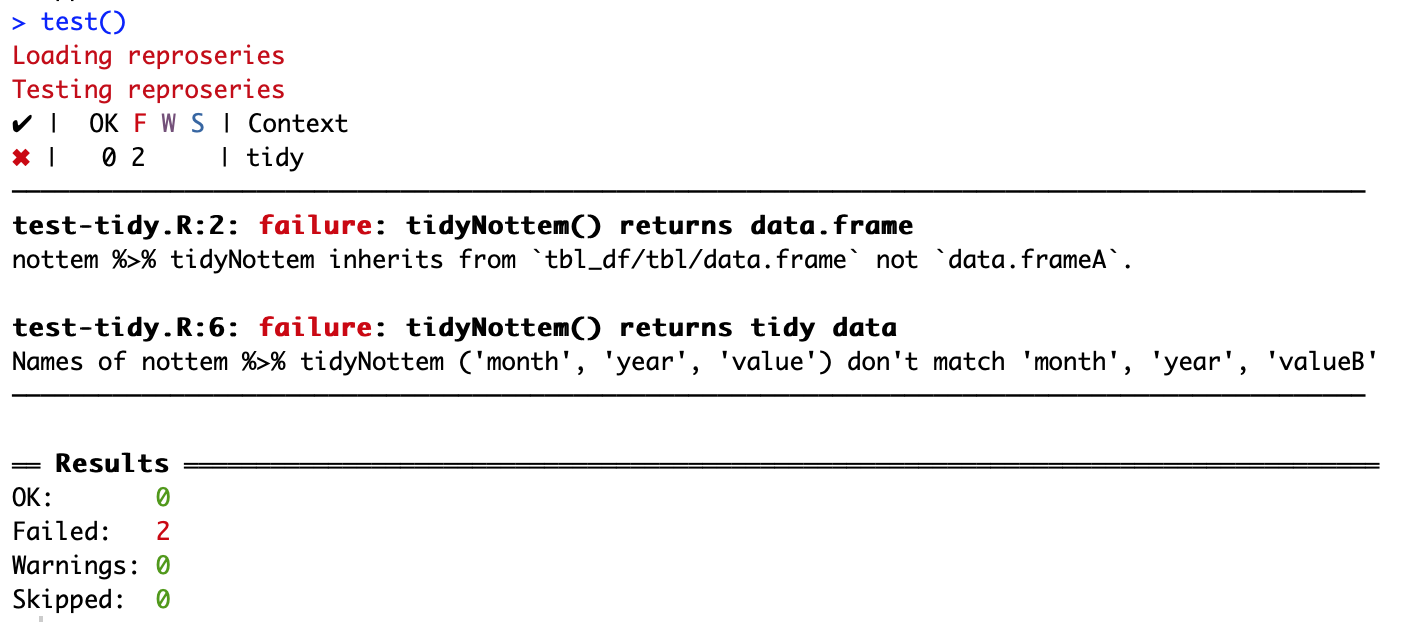
It’s a best practice to first make your test fail before seeing them pass. It increases the level of confidence. Let’s say we add some random characters to our tests. Run the tests by typing devtools::test() in the console:
test_that("tidyNottem() returns data.frame", {
  expect_is(nottem %>% tidyNottem, "data.frameA")
})

test_that("tidyNottem() returns tidy data", {
  expect_named(nottem %>% tidyNottem, c("month", "year", "valueB))
})
We get a nice explanation of what went wrong:
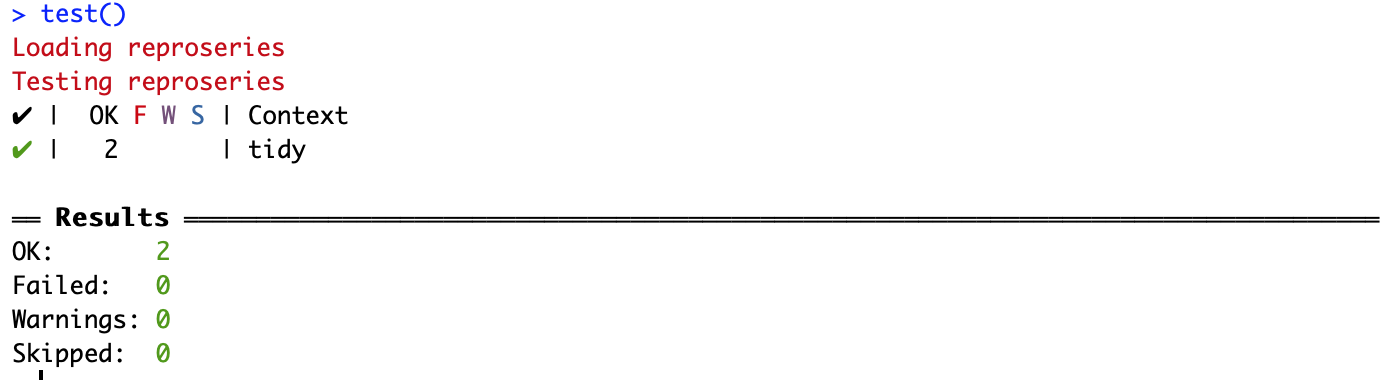
testthat makes it possible to write custom expectations but don’t do it if the default failure message is clear enough. Let’s remove A and B again, the tests pass now:
When testing data analysis code it can be tricky to know what exactly to make assertions on. The goal is not to rewrite your code in tests. I tend to stick to high level goals I want a function to achieve (return a data frame, have the right columns).
More involved example
The tests for summariseAvgTemperatureByYear() show there’s still more to testing:
test_that("summariseAvgTemperatureByYear() has year and avgTemperature columns", {
  tidy_nottem %>%
    addCelsiusColumn %>%
    summariseAvgTemperatureByYear %>%
    colnames %>%
    expect_equal(c("year", "avgTemperature"))
})
As you can see this test is in no way DRY. This is entirely on purpose. I abstract as little as possible to make it easy to debug if a test fails. You want to be able to pinpoint exactly where things go wrong. That’s the point of writing tests.
However I did a bit of setup beforehand to create the tidy_nottem dataset. I can safely assume the tidyness of the data is already tested in other tests so I can abstract that part away. This is an exceptions where making your tests DRY is an actual benefit.
Testing plots
The example above covered a lot of ground but something is still missing. How do we test functions called for their side effects? Testing tidyNottem like above was straightforward. There’s input, there’s output and we check we get the correct output with a specific input. But take for example the plotAvgTemperaturesByYear function. This function creates a plot but how do you check if this plot is correct? Packages to help with visual testing like vdiffr exist.
However, in general I choose not to use them. They’re quite difficult to setup. It involves setting up baseline plots and then manually confirming those are the plots you want. Plots change a lot between iterations as well so you risk ending up with a lot of false positives. I make just a single basic check.
test_that("plotAvgTemperaturesByYear returns plot", {
  avg_temperatures_by_year <- nottem %>%
    tidyNottem %>%
    addCelsiusColumn %>%
    summariseAvgTemperatureByYear

  expect_is(avg_temperatures_by_year %>% plotAvgTemperaturesByYear,
            "ggplot")
})
This checks if a plot is generated but I make no assertions at all on what that plot should look like. Don’t get overconfident if you see the visualization tests are passing but always check manually (it’s inevitable).
Summary
We can safely continue now knowing all our code is covered by tests:
> test()
Loading reproseries
Testing reproseries
✔ |  OK F W S | Context
✔ |   2       | model
✔ |   2       | tidy
✔ |   6       | transform
✔ |   1       | visualize

══ Results ═════════════════
Duration: 0.1 s

OK:       11
Failed:   0
Warnings: 0
Skipped:  0
Notice running all the tests only took 0.1s. That’s a small price to pay for confidence.
Setting up testing in R is not hard using testthat. The hard part is staying disciplined to write tests for each function you write. It’s so easy to get lost in building without checking but it will bite you in the end. You can make it a habit to write tests before writing code to enforce this discipline.
Now we covered testing (using testthat) and package development (using devtools). It’s time to move on to properly documenting our code.